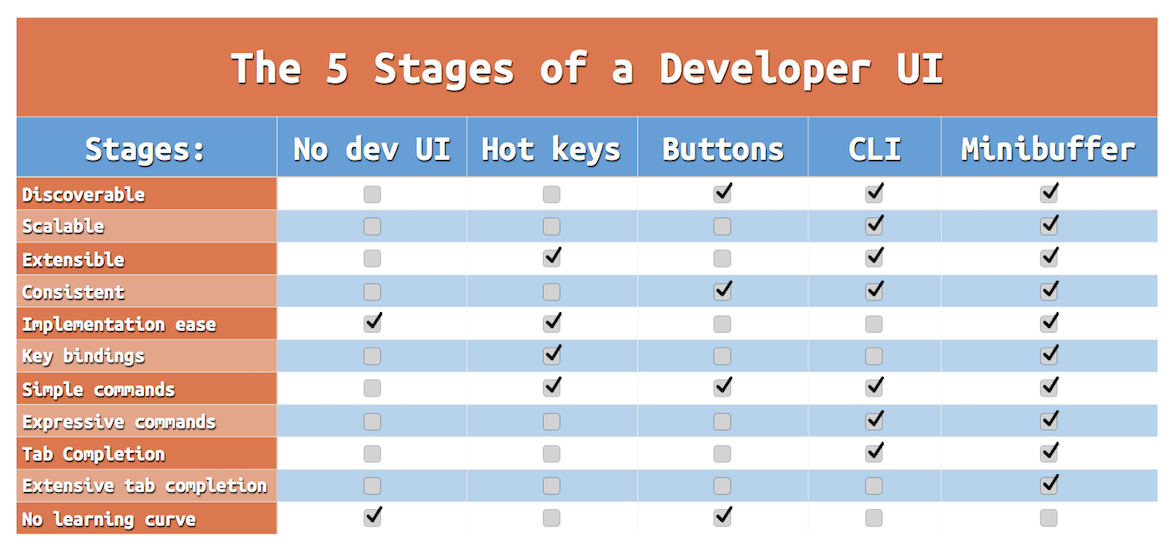
This short video caricatures what I call The 5 Stages of a Developer UI. Game developers often require specialized facilities when making a game, e.g., jump to a different scene, turn off damage, provoke an event. The issue is how do you expose those facilities? There are many ways and often a game will go through a series of stages.

- Stage 0: No developer UI
- Stage 1: Hot keys
- Stage 2: Buttons
- Stage 3: Command line interface
- Stage 4: Minibuffer
What stage is your game in?
What stages has your game gone through? Sound off!
What is a Developer UI?
Game developers create ad hoc User Interfaces (UIs) all the time to exercise their game. These UIs are for developers and testers—not players. The developer UI has different requirements from the player UI. It doesn’t have to be pretty or conventional. It can have a learning curve.
Suppose you have the skills to create an excellent UI for the player. Why not create a developer UI the same way you’d create the player UI? You could, but I think it would be like creating an lavishly furnished living space then using it only for storage; moreover, it’s hard work and time consuming. Why not reserve such hard work for one’s game proper? The player deserves a great UI. The developer deserves a consistent, discoverable, and easily extendable UI.
Please do not mistake these stages as value judgments on the respective UIs. Stage 1 isn’t strictly better than stage 2. Each stage embodies different qualities. But I would say that it’s more likely for a game to go from a low stage to a higher stage than the other way around.
I am not casting aspersions on other game developers or their UIs. Who amongst us hasn’t implemented hot keys? I have and I’d do it again! And if hot keys do everything your game needs to then why complicate your game needlessly? If, however, your current developer UI is not keeping up with the needs of developers and testers, then let this be an exposition of what other developer UIs are out there and what the trade-offs are. Maybe it can help you select your next UI.
Developer UIs often start simple but become more complicated as development and testing needs change.
What is a Minibuffer?
“I’ve heard of all these except for this ‘Minibuffer’ thing.”
 Minibuffer is a developer console for Unity that I created. Its UI is inspired principally by Emacs, but it also takes ideas from Vim and Unix shells.
Some might balk at my conceit for placing Minibuffer as the last stage. They might think,
Maybe your “Minibuffer” thing is better than hot keys or some ad hoc buttons but better than the command line interface? You must be deluded.
Indeed, the Command Line Interface (CLI) is a venerated developer tool and indispensable on Unix systems. It’s little wonder so many developer consoles have sought to emulate it. I love the CLI. I use it everyday, but I stand by my claim that Minibuffer represents a better set of trade-offs for an interactive in-game console that integrates more easily and takes better advantage of Unity.
Let me be clear that I have no animosity for hot keys or the CLI. Indeed, I come not to bury hot keys but to give them a principled foundation. I come not to replace the CLI but to expedite its construction and enhance its use (if that is your UI of preference). Minibuffer can encapsulate both UIs. I use Minibuffer to build my hot key systems, but now I get key sequences, an in-game help system, and many other benefits for free!
Easier Integration: UI by Code Decoration
In addition to claiming that Minibuffer exposes a better UI for developers and testers, I claim that its commands are easier to implement. Minibuffer proposes one create a developer UI primarily through code decoration.
Have a method you want to execute at runtime? Add a Command attribute. Done.
  [Command]
  public static string HelloWorld() {
    return "Hello, World!";
  }
Have a property or field you want to inspect or edit at runtime? Add a Variable attribute.
  [Variable]
  public bool godMode;
Need a more specific prompt for the user? Add a Prompt attribute.
  [Command]
  public string Hello([Prompt("What is your name? ")] string name) {
    return "Hello, " + name + "!";
  }
Want a key binding or “hot key” for a command? Add a keyBinding field to the Command attribute.
  [Command(keyBinding = "ctrl-h ctrl-w")]
  public static string HelloWorld() {
    return "Hello, World!";
  }
Not convinced? Well, I came prepared with an argument if you don’t find the caricature video or the Introducing Minibuffer video compelling.
The 5 Stages of a Developer UI Argument
Stage 0: No developer UI
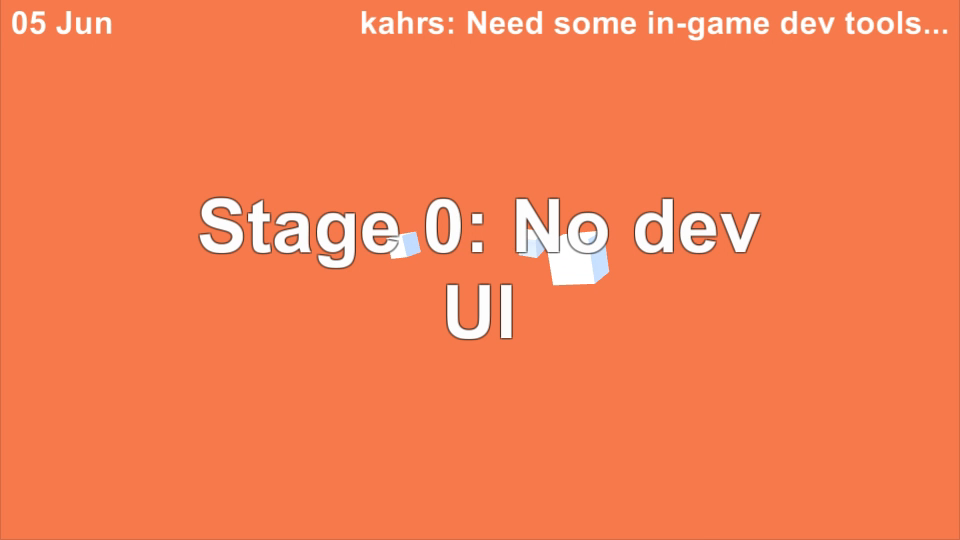
In the beginning of making a game, there often is no developer User Interface (UI) at all. This is stage 0. Inevitably a problem comes up that begs for a developer UI, e.g., there is a bug on level 5 and playing levels 1–4 would waste time. Often an ad hoc developer UI is created on contact with this problem.
Stage 1: Hot keys
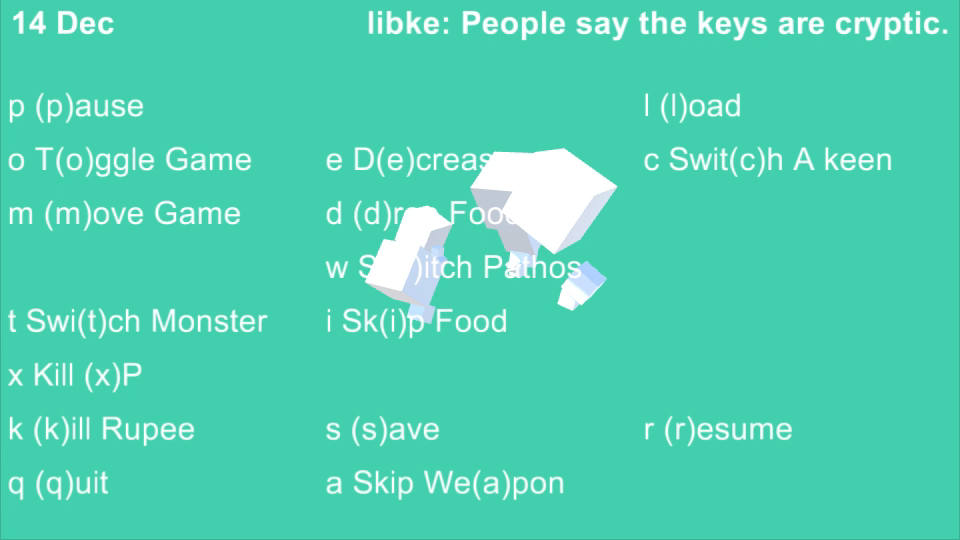 The easiest developer UI to implement is hot keys. This is stage 1. Most games will develop their own hot key system, and in terms of bang for your code, they’re very economical.
void Update() {
  if (Input.GetKeyDown(">")) {
    GotoNextLevel();
  }
}
But the next problem one bumps into is hot keys are not discoverable.
“What are the hot keys?”
“What do they do?”
“I pressed something and something weird happened!”
Are the hot keys operational all the time or only in certain contexts? Documenting them helps. Hot keys are so easy to make though, one wonders are they all accounted for? An in-game help screen for hot keys is better than external documentation. What hot key brings up the help screen: escape, F1, tab? Are any of those used by the OS or the game already?
Often hot keys don’t support key sequences which might allow for better mnemonics like ctrl-h c for “help command” or ctrl-h k for “help key”; this makes it harder for hot keys to feel consistent. The mnemonics degrade as they accrue: hot keys developed early often take the closest key mnemonically while hot keys developed late have fewer unbound keys to choose from and are often worse mnemonically as a result.
Stage 2: Buttons
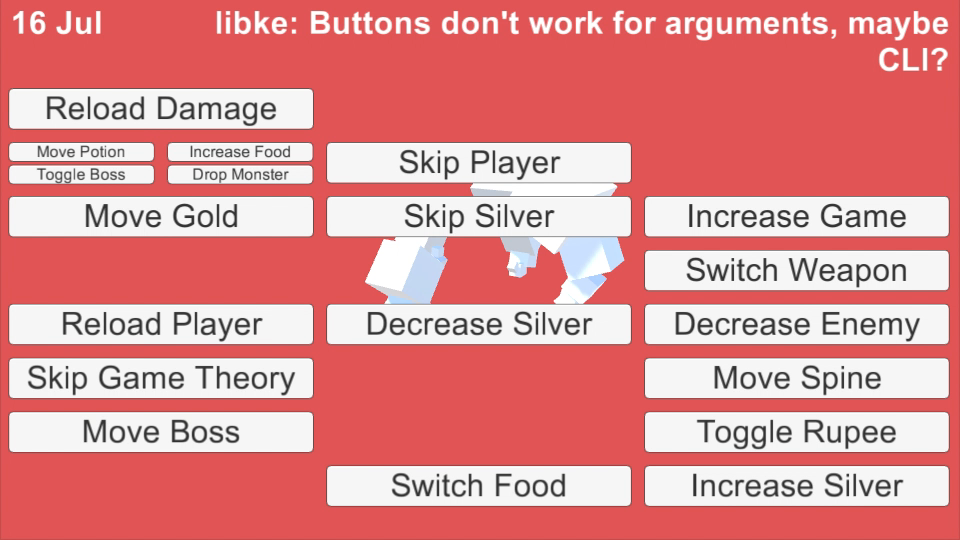
Stage 2 is a more conventional UI for developers and testers, often just some buttons. It is discoverable, but the number of UI elements is limited. That is, it’s not scalable. The more buttons and GUI elements created, the harder it is to use, the harder it is to organize. Also, adding each GUI element is laborious and time consuming.
A developer UI in stages 1 and 2 can be immensely helpful but it is limited. For example, suppose there is a bug on level 100; even skipping levels by pressing the hot key > or button 99 times is tedious. Hot keys and buttons issue simple, inexpressive commands: one can’t say how many levels they want to skip or simply what level they want to go to. One can make a new command that skips 10 levels at a time, but this exacerbates the scalability issue where adding commands makes the UI more cumbersome.
Stage 3: Command line interface
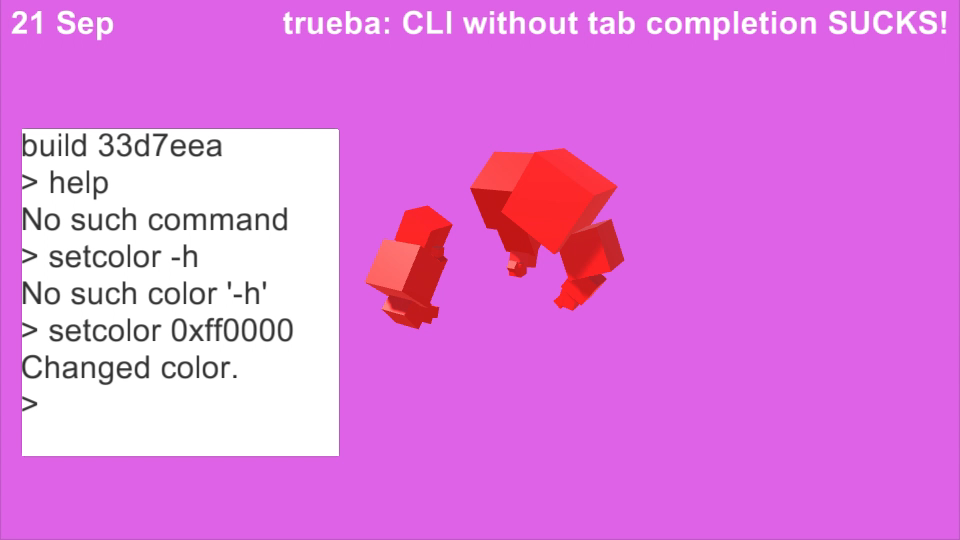
Stage 3 comes with a developer UI that’s expressive: commands can accept arguments, often a Command Line Interface (CLI). A CLI is discoverable, scalable, and expressive; however, its inspiration often comes from Unix shells that historically bring the following baggage: commands are black boxes, impoverished types (usually just strings), and they often serve two complementary roles: interactive input and non-interactive scripting.
Black Box Commands
One trade-off for black box commands is that tab complete only works reliably for the command name not its arguments because the shell does not know anything about the command. A command’s type signature is often
delegate string BlackBoxCommand([string] arguments); It only knows that the command takes an array of strings. It doesn’t know how many arguments it takes or what kind of arguments, so it cannot reliably help the user. Kiss tab completion goodbye. And CLIs without adequate tab completion aren’t worth using.
Unix shells do have adequate tab completion despite its black box commands. It tab completes file paths by default. But what would be the best default tab completion type in Unity? File paths? No. GameObjects? Scenes? MonoBehaviours? Unity offers such a rich set of objects it’s hard to say whether any default tab completer would ever make it adequate.
Lack of Types Hinder Developers and Users

The impoverished types of Unix commands are often replicated in C# CLIs with a command that only accepts and returns strings. C# however has a rich typing system. Why be content with just strings? The lack of types often mean a lot of machinations are required to go from a string argument to the object of interest.
Consider the following command that changes an object’s material from the developer’s perspective. One must validate the arguments, present an error message or usage on failure. The string argument must be converted to a Material. Only then can the real work of the command begin.
  /* Change the material of the quadrapus. */
  public string ChangeMaterialCLI(string[] args) {
    if (args.Length != 1) {
      return "usage: change-material <material-name>";
    }
    string materialName = args[0];
    Material material
      = Resources
      .FindObjectsOfTypeAll(typeof(Material))
      .Where(r => r.name == materialName)
      .Cast<Material>()
      .FirstOrDefault();
    if (material == null) {
      return "No such material " + materialName;
    }

    foreach(var mr in rootGameObject.GetComponentsInChildren<MeshRenderer>()) {
      mr.material = material;
    }
    return "Changed material to " + material.name;
  }
Is the Unix shell wrong to only use strings? No. The trade-off is that Unix is language agnostic. You can write new Unix commands in any language because strings are supported by every language. But the lingua franca of Unity is C#. Writing commands in any other language isn’t worth supporting.
Consider the change-material command from the user’s perspective. Since these are black box commands, there is no tab completion on arguments. There is no indication that only one argument is required. There is no assistance to provide the right kind of argument. The developer of the command and the user are both hamstrung by pushing all commands through an untyped, string-only interface. And the user must learn the usage or idiosyncrasies of each command that takes arguments. One gets expressive commands but at a high cost to usability.
Two Masters: Interactive and Non-interactive
A Unix shell serves two masters: its interactive users, and its non-interactive scripts. To serve these two masters, the shell requires a command and its arguments be written as a string and evaluated all at once. If it focused purely on interactive users, it might instead solicit the user for whatever arguments were required, prompting them along the way. For the Unix shell, this is a worthwhile trade-off. Scripts allow one to automate many tasks and create new commands using the shell as a non-interactive scripting language. But a game’s non-interactive scripting language is just its code, so why make this trade-off?
One unavoidable downside of a CLI is that it does have a learning curve. But because the CLI is consistent, one need only learn it once.
Stage 4: Minibuffer
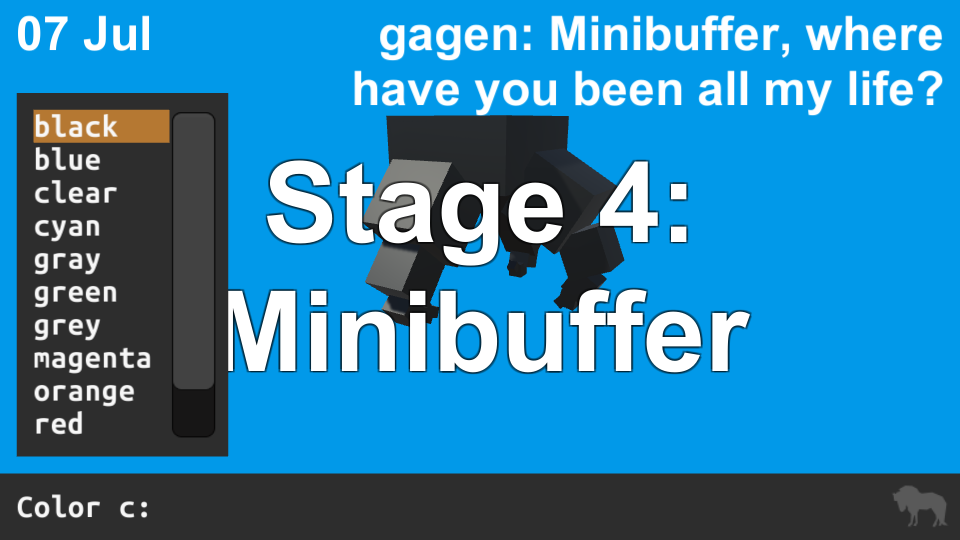
Stage 4 is a developer UI that is consistent, discoverable, and easy to extend among other things. This is Minibuffer’s aim. It has many qualities of a CLI; however, because Minibuffer has made different trade-offs than a conventional CLI it does things differently.
A Principled, Self-Documenting, Hot Key System
In addition to commands, Minibuffer also has a system for key bindings which most CLIs lack. This means you can use Minibuffer as a principled hot key system that offers key sequences and an in-game help screen. For instance, this command changes the background color and is bound to ctrl-c b. It is in both of the demos that come with Minibuffer Console.
  [Command(description = "Randomly pick a cheerful color",
           keyBinding = "ctrl-c b")]
  public void RandomizeBackgroundColor() {
    Color c = UnityEngine.Random.ColorHSV(0f, 1f, 1f, 1f, 0.5f, 1f);
    Camera.main.backgroundColor = c;
  }
Consider the concerns regarding discoverability about hot keys presented above.
“What are the hot keys?”
“What do they do?”
“I pressed something and something weird happened!”
Let’s go through each in turn.
“What are the hot keys?”
To see all “hot keys” or key bindings type ctrl-h b. To see just the “hot keys” you’ve added to Minibuffer, type ctrl-h B.
## quadrapus-commands keymap (2)
key      | command                    | description
---      | -------                    | -----------
ctrl-d   | cube-drop                  | Drop a cube into the scene
ctrl-c b | randomize-background-color | Randomly pick a cheerful color
“What do they do?”
A short description is given in the key binding listing when you type ctrl-h b. If that that isn’t enough, type ctrl-h c randomize-background-color to see more details.
randomize-background-color is bound to ctrl-c b and has no tags.
Description: "Randomly pick a cheerful color"
It is defined in class QuadrapusCommands.
  void RandomizeBackgroundColor()
“I pressed something and something weird happened!”
Let’s say whenever you press x something weird happens. How do you find out what x does? Type ctrl-h k then x. Minibuffer will show the command its bound to. If instead one typed ctrl-h k then ctrl-c b, it would show:
ctrl-c b runs the command randomize-background-color.
Commands Aren’t Black Boxes
Each input that Minibuffer solicits from the user, be it a command, an argument, or a Read() call, can have its own tab completion and history. Commands are not black boxes to Minibuffer. Minibuffer knows what arguments are needed and can handle each differently and assist the user in providing them.
Rich Types Ease Implementation
Minibuffer commands are easier to implement than CLI commands because one can accept types other than strings. Minibuffer can accept types like integers, floats, and colors for instance; these can be coerced from a string. And Minibuffer can look up objects so that you can tab complete a GameObject, a MonoBehaviour, a Scene, and many others. This makes implementing commands much easier. Often one can simply add a [Command] attribute to an existing method.
Consider the same case as above where we want to change the material of a game object. It required the following code with string arguments, which doesn’t offer tab completion or history.
  /* Change the material of the quadrapus. */
  public string ChangeMaterialCLI(string[] args) {
    if (args.Length != 1) {
      return "usage: change-material <material-name>";
    }
    string materialName = args[0];
    Material material
      = Resources
      .FindObjectsOfTypeAll(typeof(Material))
      .Where(r => r.name == materialName)
      .Cast<Material>()
      .FirstOrDefault();

    if (material == null) {
      return "No such material " + materialName;
    }
    foreach(var mr in rootGameObject.GetComponentsInChildren<MeshRenderer>()) {
      mr.material = material;
    }
    return "Changed material to " + material.name;
  }
The same command that prompts the user with tab completion for the available materials is implemented as follows with Minibuffer Console.
  /* Change the material of the quadrapus. */
  [Command]
  public string ChangeMaterial(Material m) {
    if (m == null) {
      return "No such material.";
    }
    foreach(var mr in rootGameObject.GetComponentsInChildren<MeshRenderer>()) {
      mr.material = m;
    }
    return "Changed material to " + m.name;
  }
 No usage is required because Minibuffer will request a material from the user with tab completion and history. No string processing to find the material is required because Minibuffer has a built-in tab completer for
 Material types (and many others). Both the developer and the user benefit from making use of C#‘s rich types.
A CLI Minus the String Handling

Despite drawing such strong contrasts with a conventional CLI, there isn’t any reason you can’t have Minibuffer and a CLI too. For instance, the command cli is bound to $. It offers a CLI interface to Minibuffer’s commands including niceties like argument-specific tab completion.
Type $ cube-drop and that works the same as alt-x cube-drop.
Request help by typing $ cube-drop -h instead of ctrl-h c cube-drop.
Pass a universal argument by typing $ cube-drop -u 1000 instead of ctrl-u 1000 alt-x cube-drop.
Access Minibuffer commands using a CLI if that is your preference.
UI Preferences
“Minibuffer sounds good, but I’m not an Emacs user.”
Although Minibuffer takes inspiration from Emacs, it goes to pains to make itself accessible to all game developers. The default way to run a command is alt-x, e.g., alt-x hello-world, but you might prefer something different.
Vim Users
Vim users will be happy to know that one can execute commands in Minibuffer by typing :, e.g., :hello-world. And repeat-last-command is bound to the . key.
CLI Users
CLI and shell users will be happy to know that one can execute commands in Minibuffer by typing $, e.g., $ hello-world. This works with all Minibuffer commands, and each argument has its own tab completer and history. If a CLI with extensive tab completion is what you want, Minibuffer has it.
Emacs Users
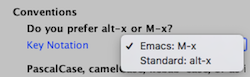
Emacs users will be happy to know that they can change the key sequence notation to Emacs’ style, e.g., M-x hello-world.
Conclusion
The tools we use can become the tools we love, and the tools we emulate. I remember falling in love with the composeability of Unix commands on the CLI. I remember groking Emacs‘ architecture: a lisp interpreter with key bindings that was dedicated to text editing. Spacemacs has helped me better understand and appreciate Vim. Passion can sometimes cloud one’s judgment though. It took me a long time to pry apart the trade-offs of each, without merely accepting each in its entirety.
I love Emacs’ minibuffer, the namesake of this project. I wish all the applications I used had a minibuffer. I can’t make that happen, but I can make the games I’m developing have those facilities that are so generally useful and enjoyable. And Minibuffer Console’s architecture is flexible enough to use as a hot key system or a CLI. You don’t need to forsake one for the other. You can have it all.
I hope this exposition illustrates some of the trade-offs for different developer UIs. And I am happy to introduce you to Minibuffer Console, an asset I labored on for over a year. No matter what developer UI you choose for your game, make your game not only a joy to play but a joy to develop. You’ll thank yourself.
Ok. That’s it. I’m going to make a minibuffer for #unity3d. #gamedev #emacs pic.twitter.com/zVB7sEFHj2
— Shane Celis (@shanecelis) May 5, 2016